
A Coquina Jasper by Any Other Name is Still a Pain to Tumble…

Coquina jasper
Elephant skin jasper
Miriam jasper
Script stone
Arabic stone
Calligraphy jasper
A Coquina jasper by any other name is still a pain to tumble…
Picture this…you have your rock tumbler and perhaps tumbled some agates or quartz. Now you’re ready for a new material to tumble. Maybe a jasper? You stumble upon Coquina aka Miriam aka Calligraphy, etc jasper and think, wow, this has such cool patterns! What an unique stone! Mohs hardness 6.5-7…perfect! Should be a breeze to tumble polish!
You get started and it loses mass a bit more quickly in stage one than you expected. You go through your usual stages either in your rotary tumbler (60/90, 220, 500, polish), or finish in your vibratory tumbler so you can finish polishing after shaping them in a week instead of three weeks. You do the final rinse and dry them off and they are…dull. Not a shine to be found.
Welcome to the lies that surround this material.
And what a bummer because this is truly a fascinating stone to look at…and to try to polish.

Researching this stone (and its name) will lead you to believe that it’s a jasper with a typical jasper’s hardness. If you Google the stone, AI will summarize how it’s a jasper, and a brief review of summaries of the stone on websites selling it, call it a jasper from India.
Except…it’s not. Well, it does come from India, but it’s not a jasper.
Let’s get into what makes this material so amazing, and how you can get it to take a polish.
Coquina means shellfish, wedge shell, or cockle, and the use of it to name this stone is apt. This material is sedimentary stone composed of fossilized shell fragments and…calcite. So that’s why there is trouble tumble polishing it! This material formed in long ago marine environments where constant wave action broke down shells of marine animals, which eventually fossilized in silica rich mud.

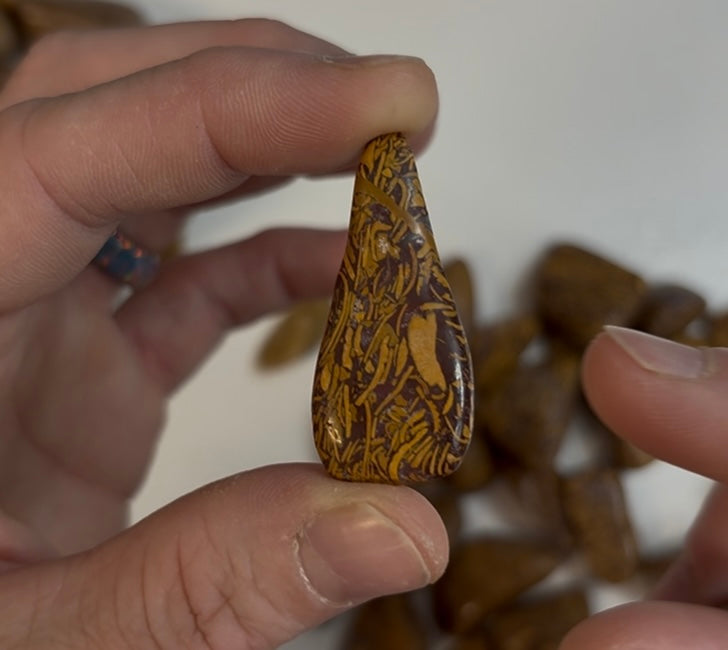
If you look closely, you can see fossil fragments of mollusks, brachiopods, trilobites, crinoids and other invertebrates. Those fragments give it its amazing patterning, but it’s iron oxidization that creates the orange coloring. The amount of silica during fossilization creates variation in the hardness of the material, causing some pieces to polish well and others to not take a polish at all during the tumbling process.
To watch a tutorial on polishing coquina jasper, please head to our Youtube Channel @MidwestShores and check it out, along with videos on other stones we polish and the myriad of other things we create with rocks and crystals.
Rough tumbling/shaping with 60/90 silicon carbide grit should be done carefully, with more frequent checks than typical. I would recommend checking every other day just to make sure you are not losing too much material during the rough grit stage.

Stage 2 with 220 silicon carbide grit should be shortened slightly in both a rotary tumbler and vibratory tumbler, because you will still lose a decent amount of material at this stage. I used a vibratory tumbler for this step when I last polished this material and ran them for about a day and a half in 220 grit. I also used a lot of ceramic media. Plastic pellets might be more advantageous for this material, but I didn’t have any and I also don’t really like to use them. I have a hard time keeping each stage’s pellets separate and organized. However, it’s worth considering their use since they are softer than ceramic media and would likely give more cushioning throughout the polishing process.

Stage 3 with 500 aluminum oxide is best, but 500 grit silicon carbide should work instead if that’s all you have. Maintain a good amount of ceramic media or plastic pellets. I would say, up to 50% of the bowl or barrel’s volume should be media. I ran the 500 grit stage for about a day.
For softer stones, I always feel it’s best to utilize the 1000 grit aluminum oxide stage, and I made sure to include it when polishing these stones. I also added equal amounts of granulated sugar to grit (you can do this even in the 500 grit stage if you wanted). I feel I get less bruising on my softer stones when I incorporate sugar into 1000 grit and polish stages. One day in this stage was sufficient.
Polish was run wet first when I polished these stones, but I didn’t love the results so I then did a dry polish run. In the future, I would skip the wet polish step altogether, and immediately go into a dry polish. I used corn cob media with aluminum oxide polish. All stones should be dry before adding them to the corn cob media (I know some people use crushed walnut shells for dry polish but I had corn cob media on hand). When doing a dry polish method, make sure at least half the volume is corn cob media and not stones. You don’t really want the stones bumping into each other very much for this method.

When using this method, make sure to wear a respirator mask while working with anything that could produce rock dust (like the corn cob media could have in it after using it to polish the stones). The media can be reused, so don't toss it when you are done.
The dry polish will likely coat your stones and be quite difficult to rub off, so I pulled them out after about 24 hours in dry polish, and then put the stones through a burnishing step with water and Borax for a couple of hours. Because of how the dry polish and corn cob media remnants get into every nook and cranny, I do think it’s particularly important to make sure you spend enough time on Stage 1 to round the stones out until they are nearly perfectly smooth.
This stone can be tricky and frustrating, but I really do think the end result is worth it. When looking at the stones up close, there are so many amazing tiny fossils to see and so many fascinating patterns created by the fossilized broken shells.
So if you are up to the challenge, this might be the material for you.

**Links may be affiliate links where we earn a small commission if you purchase, but there is no additional cost to you. Your support is appreciated!
For list of items we use for rock tumbling and other projects, check out our Supplies blog post.